Posts

Creating a Custom Chess Puzzle Printer

Image
As my son gets ready to start school, I wanted to surprise him with something special. Over the past few years, he's developed a strong passion for chess, playing it every chance he gets. So, I thought, why not combine his love for chess with a little lunchtime surprise? The idea was to create a custom chess puzzle that I could print out and include in his lunchbox as a fun note. The Inspiration and the Challenge I had some experience with thermal printers from previous projects, so I decided to use one for this idea. The challenge, however, was to find a way to generate chess puzzles easily. Creating puzzles manually would be too time-consuming, so I needed a reliable source of puzzles. As far as I know, two major chess platforms offer puzzles: Chess.com and Lichess. Fortunately, Lichess is open source and provides access to a vast database of chess puzzles . This made it the perfect choice for my project. Turning Puzzles into Printable Images With the puzzles secured, the next st

Skate Tricks Recognition Using Gyroscope

Image
In this article, we’ll describe how to recognize skateboard tricks using a gyroscope. This sensor is already present in most smartphones, but if you’re not familiar with it, here is a description . Before we dive in, a small disclaimer: This project originated as part of a Slido hackathon with the goal of demonstrating that it’s possible to recognize skateboard tricks using a gyroscope. For simplicity, we’ll focus on recognizing just two basic tricks and won’t consider the skater’s stance on the board. We’ll break down the problem into several smaller tasks: recording the trick, storing the data, describing the trick, analyzing it, and, finally, recognizing it. Recording the Trick Let’s start with trick recording. To obtain precise data, the device with the gyroscope needs to be attached directly to the skateboard. Place it on the bottom of the board to avoid interfering with the execution of the trick. The device should also be compact and lightweight to avoid altering the board’s cen

Reviving an Old LED Screen: From Dust to Drum Visualizer

Image
A few years ago, I built a large LED screen out of empty toilet paper rolls. It was a fun DIY project controlled by an Android app, and I even wrote an article about it. But after some time, the screen ended up unused, just sitting around collecting dust. When I recently decided to check it out, I found that some of the LEDs were no longer working. I was ready to toss it out, but then an idea hit me. The Drum Set and the Spark of an Idea Last Christmas, we welcomed a new addition to our home—a drum set (Alesis Drums Nitro Mesh Kit). While setting it up and exploring its features, I noticed that it supported MIDI output, and I realized that my old LED screen could be repurposed as a visualizer for the drum set. This would not only breathe new life into the screen but also enhance the drumming experience with dynamic light displays. Upgrading the LED Screen The first step was to replace the non-functioning LEDs. I decided to upgrade to RGB LEDs this time, allowing for a broader range of

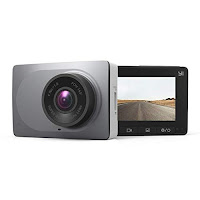
DIY Android App for Yi Dash Car Camera

Image
Why A friend asked me to develop an Android app for his new Yi Dash Car Camera . The camera has impressive specifications at a very low price. He showed me the native Android app available on Google Play but needed a way to download and search video files by specific timestamps. About the Camera The camera operates on its own Wi-Fi network. To interact with it, you must be connected to this Wi-Fi. It automatically records videos, each approximately 3 minutes long, when powered on. Recording stops during downloads or settings changes. The official app also allows you to take a picture, which is essentially a screenshot from the video stream. What I Did Initially, I tried using an SDK from the camera's manufacturer, but it did not support this model. After contacting support, I learned that this camera lacks an official SDK. I then downloaded their app and examined the source code using an online decompiler , which was not obfuscated. Despite this, navigating the source code was ti

Toilet Roll Light Wall

Image
LED Screen Made of Empty Toilet Rolls Why? The initial idea was to find a creative way to reuse empty toilet rolls while having some fun with Arduino and LEDs. I started by gluing together the first block, consisting of 4x3 LEDs connected to an Arduino Nano. As the project progressed, I thought it would be interesting to control the LED screen directly from an Android device. To make this possible, I added a Bluetooth adapter and developed a  Android app. As time passed and more empty toilet rolls became available, I continued building one block after another. Eventually, I set a goal to create a 4x4 grid of blocks, totaling 192 LEDs. As I expanded the physical screen, I also enhanced the functionality of the Android app, adding new features to control the growing display. first 6 blocks What Can It Do? Since the video below demonstrates it clearly, I'll just briefly list the features of the Android app: Draw (real-time): Allows real-time drawing on the LED screen. Toggle Ra

Drone Following Instructions

Image
Reading Instructions from QR Codes and Executing Them Using an Android Application Introduction Recently, I had the opportunity to build a drone prototype controlled by an Android device. The requirements were clear: the drone needed to be small in size and come with an SDK that supported video streaming. After some research, I decided that the Bebop 2 from Parrot was the best choice. Parrot is one of the few companies that offers an open SDK for developers, and they recently released the third version of their SDK. To get started, I worked with the Android application example provided by Parrot. This example covers almost every basic feature: connecting to the drone, moving it around, capturing high-quality photos, and accessing the drone’s media. One of the tasks for this prototype was to enable autonomous landing on a pattern. After researching existing solutions, I found a paper that explained the theory behind autonomous landing. This inspired me to create an Android applicatio

Robotic Arm with Computer Vision

Image
Robotic Arm with Computer Vision - Picking Up the Object Idea The main idea behind this project was to create an environment where a robotic arm can execute various commands based on image analysis of a scene. In this article, I will describe each part of the project in detail. For the first task, I focused on detecting and moving a single object. Environment The setup consists of several components assembled together. I used an old table as the base, repainting it white to provide better contrast with the objects. The robotic arm, which I purchased from eBay, is mounted on the middle of the longer side of the table. The arm has six servo motors, including a rotating base and claws at the other end. The parts are made of aluminum and are quite sturdy. Next, I cut and mounted perforated metal ledges to the corners of the table, securing everything together. I then attached an RGB LED strip to the bottom side of the top part of the structure. Finally, I placed a USB ca