Posts

Showing posts from 2015

Using a Proximity Sensor for Scrolling Documents

Image
What For Christmas, I treated myself to a Touchboard from Bare Conductive. This board features an Atmel ATMega32U4 microprocessor, 12 analog inputs, and 20 digital pins. Being part of the Arduino family, it’s compatible with the Arduino IDE, which makes it a versatile tool for various projects. The Touchboard comes with a unique conductive paint called "bare paint," which, when used with the analog inputs, allows you to create touch or proximity sensors. First Impressions When I first experimented with the proximity sensor, using it to adjust volume felt almost magical! I was impressed by the precision of the proximity detection. The SDK provides around 10 examples to get started, and the libraries are straightforward, allowing you to accomplish a lot with just a few lines of code. The board supports both MP3 and MIDI sound effects. MP3 files can be updated on a microSD card, while the MIDI mode offers over 100 musical instruments. Switching between MP3 and MIDI requires conn...

Programming the Atmel ATmega8L Microcontroller

Image
Introduction   In this article, I'll dive into hardware programming by working with a microcontroller (MCU). Having no prior experience with MCUs, this post will walk you through my learning process and project development. Getting Started   Based on a colleague's recommendation, I decided to use a USB-AVR programmer compatible with Atmel AVR microcontrollers. I ordered the USB-AVR programmer, an ATmega8L microcontroller, some resistors, LEDs, and a breadboard. For development, I prefer using IDEs due to their features like syntax highlighting and integrated build tools, which save time and resources. I chose Eclipse for this project. Setting up Eclipse for AVR programming involves installing the following libraries: gcc-avr : Compiler for Atmel AVR microcontrollers. binutils-avr : Cross-compiling version of GNU binutils. gdb-avr : GDB for debugging AVR binaries. avr-libc : C library for GCC on Atmel AVR microcontrollers. avrdude : Tool for transferring hex files onto the micr...

Sms Grocery List

Image
Widget with Grocery List Created from Received Messages Why? I often found myself with messages containing shopping lists that I wanted to keep track of while heading home. My initial idea was to create an invisible app that would read incoming messages and automatically add their content to Google Keep, displaying it in a widget. However, I discovered that Google Keep does not offer an API for third-party integration. As a result, I decided to develop an app with this functionality. What Did I Do? The application includes a receiver that captures all new messages. Once a message is received, the app scans for predefined keywords. You can configure multiple keywords to search for in incoming messages. Additionally, the app allows you to set up reminders, which will trigger notifications at a specific time of day when at least one message has been received. These settings can be found in the app's side menu under "Settings." The second key feature of the application is its...

Exploring Development for the Sony SmartWatch: First Edition

Image
Introduction In this post, we'll delve into the development for the first model of Sony Smart Watches. While the third edition is currently available, I recently had the chance to experiment with the original model. I picked up two Smart Watches at a local flea market for just 3 EUR each. However, they came without an adapter or wrist strap. Sony’s proprietary cable presented a challenge, but I managed to made my own using old USB cables. For anyone facing a similar issue, you only need two of the four pins on the cable: VCC (power) and ground. Setup Unlike common Android devices, there isn't a universal SDK for smartwatches. Each manufacturer provides their own SDK. To use official apps, you first need to install the "Smart Connect" app, which allows you to pair your watch with your device. After installation, you can download apps from the Google Play Store. Note that these apps won’t appear in the app list on the watch because they don't contain a runnable Acti...

Detecting Changes in Android Contacts

Introduction In this post, we'll explore how to detect changes in Android contacts. Android OS provides a mechanism for contact storage known as the Contacts Provider. This provider offers a structured set of data and a standard interface that connects data across different processes. Structure of Android Contacts ContactsRaw Table _id : RAW_CONTACT_ID account_name : e.g., email address account_type : e.g., com.google.com deleted : Indicates if the contact is deleted The ContactsContract.RawContacts.CONTENT_URI table contains original contacts, mainly storing RAW_CONTACT_ID . Contact details are stored in the ContactsContract.Data table. Contacts Table _id : CONTACT_ID (refers to a group of RAW_CONTACT_ID s) lookup : Provides a link to all contact details in this table The Contacts.CONTENT_URI table groups RawContacts based on merging rules. If a raw contact can't be grouped with an existing contact, a new contact is created. The LOOKUP_KEY is a permanent link to a conta...

Comparing Facebook and Google+ Login Integration for Android Apps

Recently, I had the opportunity to implement Facebook and Google+ login functionalities into an Android application. I decided to write a brief comparison of the two integration processes using Facebook SDK v4.3 and Google Play Services v4.3.23. Google+ Server-Side Setup : Requires creating a new app on the Google Developers Console. Android Manifest : You need to add the generated API key into the Android manifest file. Implementation : Involves a few methods. Your activity needs to implement ConnectionCallbacks and OnConnectionFailedListener . Facebook Server-Side Setup : Also requires creating a new app on the Facebook Developers site. Android Manifest : You need to add the generated API key to the Android manifest and declare one activity. SDK Compatibility : The SDK is not compatible with Eclipse directly; however, there are workarounds available on Stack Overflow. XML Customization : Customizing the Facebook button in XML requires overwriting styles in the Facebook SDK, which is...

Thermal Printer Perl Library

Image
What Last month, I developed a web GUI for my Raspberry Pi thermal printer. Despite extensive testing, I struggled with some fundamental tasks, such as printing text with diacritics and creating custom characters. Existing libraries were available in Python and C, but Perl options were limited and often lacked the methods I needed. This prompted me to create my own Perl library for the Adafruit thermal printer. What I Did I created a Perl library for the Adafruit thermal printer by thoroughly reviewing the printer's documentation and implementing methods for nearly every command mentioned. The library includes standard functionalities for altering fonts, generating barcodes, and printing images. Additionally, I added some custom features: Printing Images with Gradient Effects : This feature allows you to print images with a gradient effect, enhancing visual appeal. Aligning Images : If an image is narrower than the printing paper, this method adjusts its alignment. Registering Cust...

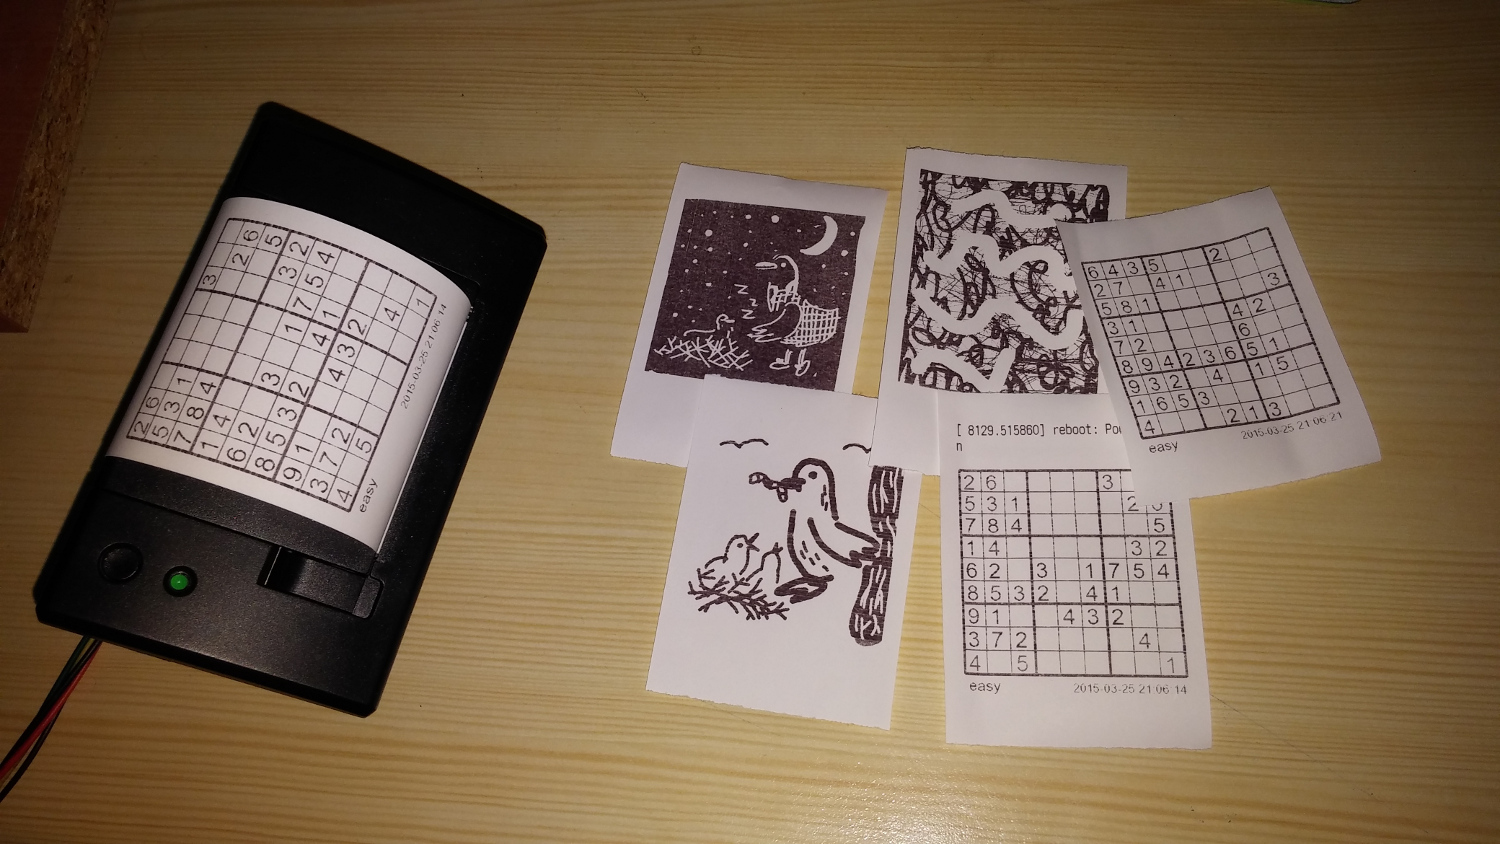
Connecting a Thermal Printer to a Raspberry Pi B+ with a Server-Side GUI

Image
What is a Thermal Printer? Thermal printers are commonly used for printing receipts in stores. They operate using special thermal paper that reacts to heat, allowing the printer to create images or text without needing ink. These printers are widely available for purchase online. When connecting a thermal printer to a Raspberry Pi, it's crucial to use an adapter with the correct amperage; otherwise, you may encounter issues like faded prints or no output at all. What I Did I successfully connected a thermal printer to a Raspberry Pi and configured it to periodically request new content from a server. I utilized a Python library to print images, barcodes, and formatted text. To make the printer more versatile, I developed a web-based GUI that allows users to create content for the printer. The features include formatted text input, a basic canvas for drawing, and a Sudoku generator with adjustable difficulty levels.      

Using the LG G3 Circle Case SDK to Create a Demo Application

Image
What is the Circle Case? LG offers a unique accessory for its G3 model—a special case with several advanced features. This case supports NFC technology, wireless charging via the Qi standard (available in the European market), and includes a circular cutout on the front cover. This circular window allows users to interact with about one-third of the display using a customized GUI, providing quick access to certain apps and functions. LG G3 SDK To help developers leverage the circle case's features, LG released a lightweight SDK. The core functionality revolves around detecting the opening and closing of the case using a hidden magnet within the case and a sensor behind the screen. The SDK provides a broadcast receiver to capture these events. Here's a basic example of how you can use this in your app: public class QCircleActivity extends Activity { // [START]declared in LGIntent.java of LG Framework public static final int EXTRA_ACCESSORY_COVER_OPENED = 0; public s...

Controlling an Owi Robotic Arm with Raspberry Pi Using Keyboard, WebSockets, and OpenCV

Image
How It All Started I recently received a Raspberry Pi (Model B+) as a gift for my 27th birthday. Naturally, the first thing I did was explore the GPIO (General Purpose Input/Output) pins that can be programmed. I quickly discovered the RPi.GPIO Python library, which supports GPIO manipulation, and I began experimenting with some basic circuits—toggling LEDs, working with an RGB LED, generating speaker beeps, and more. A few months earlier, a colleague had shown me a webpage featuring robotic arms that caught my attention. The closest retailer selling robotic arms was in the Czech Republic, and they only had one model available—the Owi robotic arm. So, I decided to get it and combine it with my Raspberry Pi. Connecting the Owi Arm to the Raspberry Pi The first challenge was connecting the Owi robotic arm to the Raspberry Pi. The model I purchased came with a joystick controller, so I had to figure out how to connect it to the Raspberry Pi. After a few hours of searching, I found a video...